
Adding a Deck: What the Structural and Permit Requirements Actually Involve
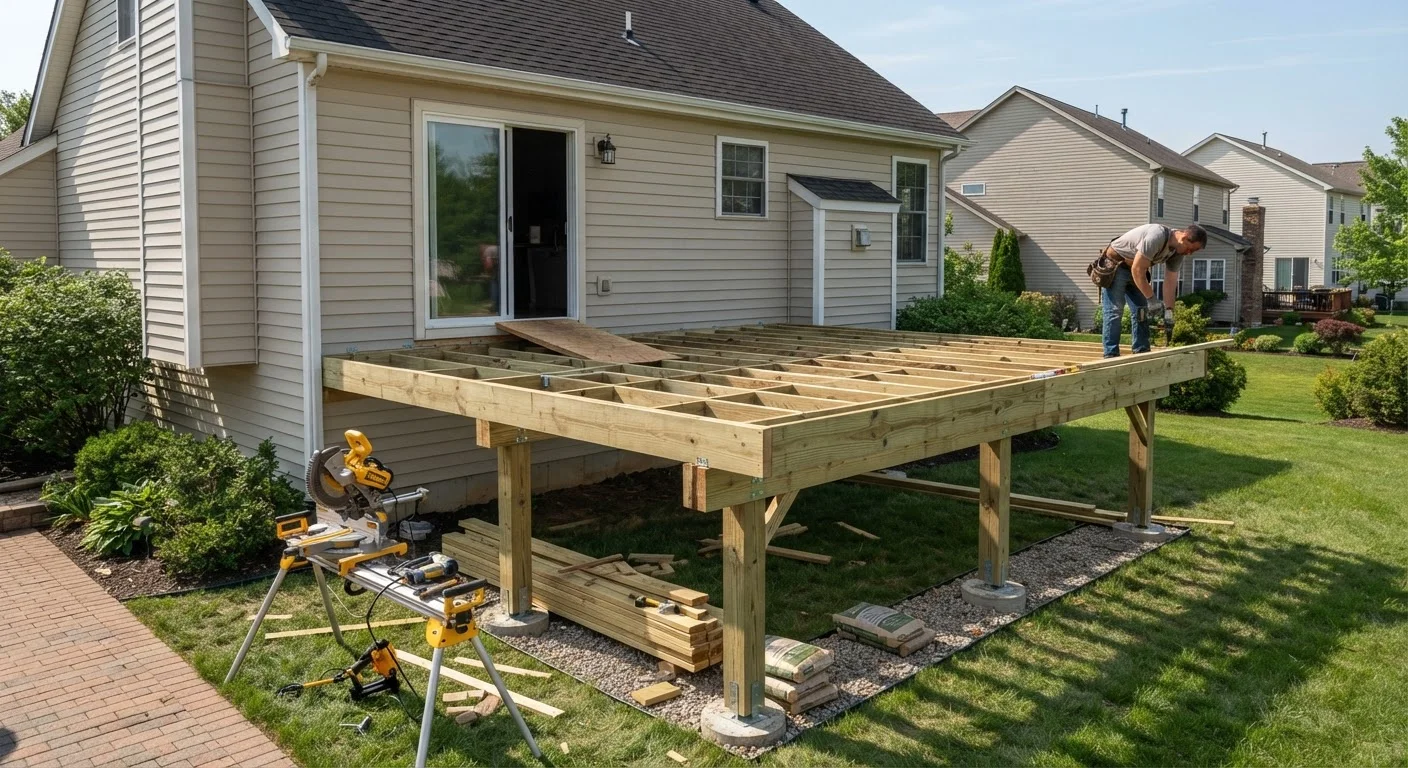
Photo credit: ExplorerGrid.com | Endless Grid Of Factual Content
In this article
Deck additions involve footings, ledger attachment, load calculations, and local permits. Here's what that process looks like in practice.
Key Takeaways
- Most jurisdictions require a building permit before any deck construction begins — skipping it creates real liability.
- Footings must extend below the local frost line to prevent seasonal movement and structural failure.
- The ledger board connection to your house is the most code-scrutinized element of the entire build.
- Load calculations determine beam, joist, and post sizing — guesswork here is a structural risk.
- Inspections typically happen at multiple stages, not just at project completion.
- Licensed professionals are recommended for footings, ledger attachment, and any electrical or gas integration.
Why Decks Require More Engineering Than Most Homeowners Expect
A deck may look like a straightforward carpentry project, but from a code and structural standpoint, it's treated much like a room addition. Decks carry live loads — people, furniture, grills — and dead loads (the weight of the structure itself), and local building codes set precise requirements for how those loads must be transferred safely into the ground.
Most municipalities require a building permit for any deck that is attached to the house, elevated above grade, or exceeds a certain square footage (often as low as 200 square feet). Detached, ground-level platforms sometimes fall under different thresholds, but you should never assume an exemption applies without confirming with your local building department first. As we explain in our related guide on permits, inspections, and code, unpermitted work can complicate a home sale and expose you to liability if something goes wrong.
The structural requirements that govern a deck build generally fall into four categories: footing design, ledger attachment (for attached decks), framing and load calculations, and guardrail and stair specifications. Understanding each helps you have an informed conversation with a contractor or inspector — and helps you recognize when shortcuts are being taken.
The Four Structural Elements Your Plan Must Address
1. Footings
Footings anchor the deck posts into the ground and must reach below the local frost depth — the depth at which soil typically freezes in winter. In northern climates this can be 42 to 60 inches; in milder southern regions it may be as shallow as 12 inches. Frost depth data is available from your local building department or through county soil surveys. Footings that sit above the frost line will heave seasonally, causing posts to shift and the deck to rack or separate from the house.
Footing diameter and concrete volume are calculated based on the tributary load each post must carry — the weight of the deck area it supports. Your permit drawings will typically need to specify footing diameter, depth, and concrete mix or psi rating. This is work best verified or performed by a licensed contractor.
Ledger Flashing Is Non-Negotiable
Water intrusion behind an improperly flashed ledger board is one of the most common causes of hidden structural rot in both the ledger itself and the house's rim joist. Proper through-wall flashing, sloped to drain, must be installed before any fasteners penetrate the house's weather barrier. This detail is frequently flagged during inspections and is worth getting right the first time.
2. Ledger Board Attachment
On attached decks, the ledger is the board fastened to the house's rim joist or band joist and carries half the deck's load directly into the home's structure. It is one of the most inspected elements of any deck build because improper attachment — wrong fastener type, spacing, or penetration into the wrong substrate — is a leading cause of deck collapses.
Code (typically referencing the International Residential Code or a local equivalent) specifies the exact lag screw or through-bolt pattern, required flashing to prevent water intrusion, and the need to confirm the house's band joist can carry the load. Never attach a ledger to a cantilevered floor, to a rim joist over a basement window, or to EIFS/stucco siding without specific engineering guidance.
3. Beam, Joist, and Post Sizing
Span tables — published in the IRC and adopted by most state and local codes — govern the maximum distance a joist or beam of a given lumber species, grade, and dimension can span without intermediate support. Your permit drawings must show joist size and spacing, beam size and span, post size, and lumber grade. Undersizing any of these elements creates deflection, squeaking, or failure over time.
4. Guardrails and Stairs
Any deck surface more than 30 inches above grade typically requires a guardrail at least 36 inches tall (42 inches in commercial applications). Balusters must be spaced so a 4-inch sphere cannot pass through. Stair risers, treads, handrail graspability, and landing dimensions all have code minimums that inspectors will verify.
Walking Through the Permit and Inspection Process
The permit process for a deck generally follows this sequence:
Contact Your Local Building Department
Before drawing a single line, call or visit your local building or planning department. Ask whether your proposed deck requires a permit, what documentation is required (site plan, framing plan, footing details), and whether a licensed contractor must pull the permit. Confirm the local frost depth while you're there.
Prepare a Site Plan and Construction Drawings
Your permit application will typically require a scaled site plan showing the deck's location relative to property lines, the house, and any easements. You'll also need construction drawings showing footing locations and dimensions, post, beam, and joist sizing, ledger attachment detail, and guardrail and stair specifications. Drawings must reference lumber species and grade.
Submit Your Permit Application and Wait for Approval
Submit your completed application, drawings, and any required fees. Do not begin construction until the permit is approved and posted on site. Starting work before approval is a common mistake that can result in stop-work orders or required demolition.
Schedule and Pass Footing Inspection
Excavate footing holes to the required depth and diameter, set forms if required, and call for the footing inspection before pouring concrete. The inspector will verify depth, diameter, and that soil conditions are adequate. Only after the footing inspection is signed off should you pour concrete.
Complete Framing and Schedule Framing Inspection
Once footings have cured, complete post installation, beam setting, ledger attachment, and joist framing according to approved plans. Install required joist hangers and hardware. Call for a framing inspection before installing decking boards, which would obscure the structure from the inspector's view.
Complete Decking, Railings, and Final Inspection
Install decking boards, guardrails, balusters, stairs, and handrails according to approved plans. Verify baluster spacing, rail height, and stair dimensions before calling for final inspection. After a passing final inspection, obtain your certificate of occupancy or final sign-off and keep it with your home records.
A few practical notes: Many building departments now accept digital plan submissions. Turnaround time varies widely — from a few days in smaller jurisdictions to several weeks in busy urban areas. Factor this into your project timeline before scheduling labor.
Inspections typically occur at least twice: once after footings are dug and forms set (before concrete is poured), and once after framing is complete but before decking boards cover the structure. Some jurisdictions add a final inspection after decking and railings are installed. Missing an inspection stage may require you to uncover completed work.
Deciding What to DIY and What to Delegate
Experienced DIYers with carpentry skills can often handle framing, decking installation, and railing assembly — provided they work from an approved set of plans. The stages that most commonly benefit from professional involvement are footing excavation and concrete work, ledger attachment (especially if it involves opening the house's exterior cladding and flashing), and structural plan preparation if your building department requires stamped engineering documents.
Some jurisdictions require that permit applications be submitted by a licensed contractor. Others allow homeowner-builder permits for owner-occupied primary residences. Confirm your local rules before assuming you can pull your own permit.
Budget conservatively. Deck construction costs vary significantly by region, material choice, deck height, and complexity. Getting at least two detailed written estimates from licensed, insured contractors — and reviewing what each includes — is a sound practice before committing to a scope of work.
This article provides general educational information about deck construction requirements. Building codes vary by jurisdiction, and specific structural decisions should be verified with a licensed contractor or your local building department before work begins.

Author
Home & Garden Editorial Team
Home & Garden Editorial Team is the collective byline for our editorial team and contributor network. Articles published under this byline or an editorial pen name are researched, written, and reviewed according to our editorial standards for clarity, consistency, and independence before publication.
View all articles →